As a passionate home cook and cast iron skillet enthusiast, I’ve encountered my fair share of kitchen mishaps. One of the most frustrating challenges I’ve faced is dealing with melted plastic on my treasured skillet.
However, over time, I’ve developed a reliable method to handle this sticky situation without causing any damage. In this article, I’ll share my step-by-step approach to remove melted plastic from a cast iron skillet, so you can salvage your beloved cookware too.
Gather Your Materials
Before diving into the process, let’s make sure you have everything you need. Here’s a list of essential items to get started:
- Oven mitts or heat-resistant gloves: Safety first! Protect your hands from the hot skillet.
- Plastic scraper or spatula: A non-abrasive tool to scrape off the melted plastic without scratching the skillet’s surface.
- Ice pack or ice cubes: To help harden the plastic for easier removal.
- Plastic bag: To prevent direct contact between the ice and skillet.
- Metal spoon or spatula (optional): In case you need to tackle stubborn bits of plastic.
- Dish soap: For cleaning the skillet after removing the plastic.
- Soft cloth or sponge: To scrub the skillet gently without causing damage.
- Baking soda (optional): For extra cleaning power on stubborn residue or stains.
Freezing the Melted Plastic
With your materials at hand and determination to rescue your beloved cast iron skillet, it’s time to tackle that sticky melted plastic! The process starts by strategically using the power of cold to your advantage. Here’s a step-by-step guide on how to freeze the plastic and make it easier to remove:
- Prepare the Ice Pack or Ice Cubes: Grab an ice pack or some ice cubes from the freezer. If you don’t have an ice pack, don’t fret; you can easily use a handful of ice cubes instead.
- The Plastic Bag Trick: To avoid direct contact between the ice and the skillet, which might cause condensation and potentially worsen the situation, place the ice cubes in a plastic bag. This will prevent any water from dripping onto the skillet while freezing the plastic.
- Position the Ice Bag: Carefully position the ice-filled bag directly over the area where the plastic has melted onto the skillet surface. Gently press it down to ensure good contact with the plastic.
- The Waiting Game: Now comes the patience part. Allow the ice-filled bag to sit on the melted plastic for about 5 to 10 minutes. The cold temperature will gradually work its magic, causing the melted plastic to solidify and become less adhesive.
- Test and Proceed: After the waiting period, test the plastic by lightly touching it with your finger or the back of a spoon. If the plastic feels significantly hardened, you’re ready to move on to the next step. If it still feels soft, give it a little more time with the ice.
- Remove the Ice Bag: Once the plastic has hardened sufficiently, carefully lift the ice-filled bag from the skillet. You’ll notice that the melted plastic has become less sticky and easier to work with.
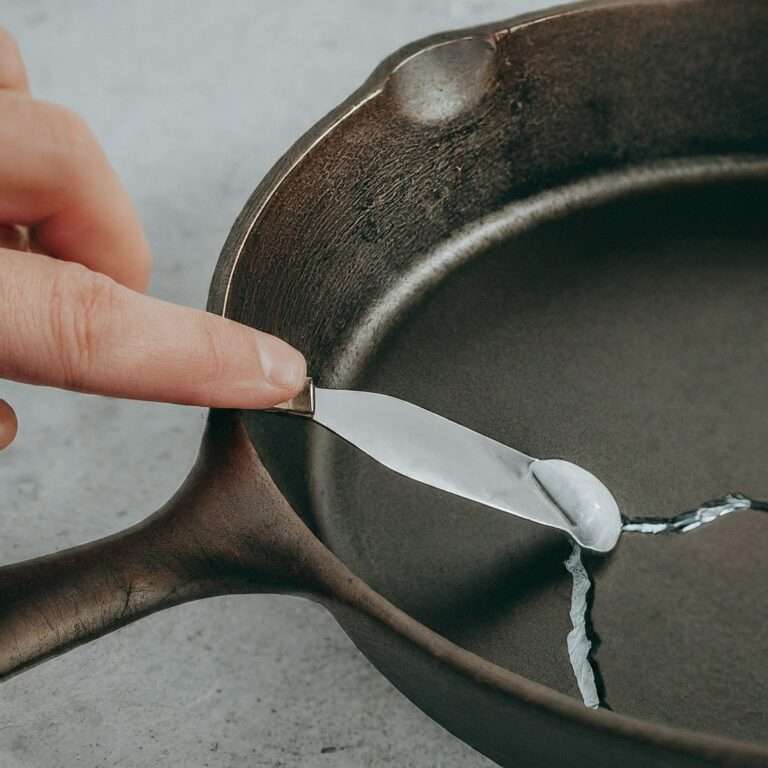
Gentle Scraping
Now that the melted plastic has been sufficiently hardened, it’s time to embark on the next crucial step: gentle scraping. Armed with your trusty plastic scraper or spatula, follow these careful steps to delicately remove the plastic from the surface of your beloved cast iron skillet:
- Position Your Scraper: Take your plastic scraper or spatula in hand, ensuring that the tool is clean and free from any residue. Position it at a slight angle against the edge of the melted plastic. The goal is to create a gentle wedge between the plastic and the skillet.
- The Delicate Approach: With the scraper in place, apply light pressure and begin to slide it underneath the hardened plastic. As you gently move the scraper along the skillet’s surface, you’ll start to notice the plastic lifting off. Be patient during this process; haste might lead to unnecessary scratches or damage.
- Steady and Gentle Strokes: Continue the gentle scraping motion, working your way across the affected area. Avoid using excessive force or aggressive movements, as this could scrape the seasoning or cause visible marks on the skillet.
- Adapt and Adjust: Depending on the amount and thickness of the melted plastic, you might need to adapt your scraping technique. If you encounter more resistant spots, slow down and carefully focus on those areas to avoid leaving any plastic residue behind.
- Reposition the Scraper: Periodically, reposition the scraper to ensure you’re using a clean and effective edge. This will help maintain the scraping efficiency and prevent inadvertently spreading the melted plastic further.
- Celebrate Progress: As you steadily scrape, you’ll notice the satisfying sight of the plastic relinquishing its hold on the skillet’s surface. Celebrate each bit of progress and continue with the same tender care.
- Avoid Metal Tools: While the temptation to speed up the process might arise, resist the urge to use metal tools for scraping. Metal can scratch the skillet’s surface, and we want to maintain the integrity of your cherished cookware.
- Take Your Time: Removing the melted plastic from the cast iron skillet is a meticulous process, and it’s essential to take your time to achieve the best results. Rushing may lead to accidental damage and compromise the skillet’s quality.
Applying Heat
In the pursuit of pristine cast iron perfection, we may encounter some pesky plastic that refuses to budge. Fear not! There’s a nifty trick to tackle these stubborn remnants and get your skillet back on track. Here’s how to apply gentle heat to soften the remaining plastic, making it easier to remove:
- Choose Your Heat Source: Depending on your preference and convenience, you can either use your stovetop or oven to apply the gentle heat. For the stovetop method, place the skillet directly on a burner over low heat. If you prefer the oven, set it to a low temperature, typically around 250°F (120°C).
- Cautionary Note: Before proceeding, ensure that your stovetop or oven is clean and free from any food residue or debris. This precaution will prevent any unwanted scents or flavors from transferring to your cast iron skillet.
- Patience is Key: Allow the skillet to warm up slowly over low heat. Patience is the name of the game here; we want to avoid overheating, as it may damage the skillet or cause the remaining plastic to melt further into the surface.
- The Softening Process: As the heat gently warms the skillet, you’ll begin to notice the remaining plastic softening. This makes it more pliable and cooperative, preparing it for the next step in our plastic removal mission.
- Monitor Carefully: While the heat works its magic, keep a close eye on the skillet. We’re aiming for a gentle warmth, not a blazing inferno. Take care to avoid overheating, as it might compromise the seasoning or cause other unwanted effects on the skillet.
- Timing is Everything: The duration for applying heat varies depending on the amount of remaining plastic and the heat intensity. In most cases, a few minutes should be sufficient to soften the plastic and make it easier to remove.
- The Final Stretch: Once you’ve achieved the desired softening, it’s time to go back to your trusty plastic scraper or spatula. With the plastic more malleable, you’ll find it much easier to scrape off the last traces of the melted plastic.
- Patience Revisited: As with the initial scraping process, exercise patience and a gentle touch when removing the softened plastic. Steady and careful strokes will ensure successful plastic removal without harming the skillet.
A Little More Scraping
Now that you’ve applied the gentle heat and softened the remaining plastic, it’s time for the final push to banish the plastic from your beloved cast iron skillet. Armed with your plastic scraper or spatula, follow these careful steps to remove the last traces of melted plastic:
- A Precise Approach: With the plastic now slightly softened, it’s essential to maintain your meticulous and patient approach. Position your plastic scraper or spatula at a slight angle against the softened plastic.
- Methodical Scrape: Begin to gently and methodically scrape off the softened plastic from the cast iron surface. Focus on small sections at a time, ensuring a smooth and controlled movement. Steady, precise strokes will yield the best results.
- Avoid Applying Excessive Pressure: The softened plastic should come off relatively easily with gentle pressure. Avoid using excessive force, as this might lead to scratches or damage to the skillet’s seasoning. Let the scraper do the work, allowing the plastic to lift off effortlessly.
- Inspect Your Progress: Periodically pause to inspect your progress. Take note of any areas that might require more attention or where stubborn remnants persist. Don’t rush; take your time to ensure a thorough job.
- Be Patient with Stubborn Spots: Some areas might be more resistant than others. Don’t be discouraged; instead, be patient and persist in working those stubborn spots. With each gentle scrape, you’ll see the plastic gradually disappearing.
- Reposition the Scraper: As you continue scraping, periodically reposition your plastic scraper or spatula to maintain a clean and effective edge. This will ensure an efficient removal process without accidentally spreading any remaining plastic.
- Celebrate the Victory: As you meticulously scrape away the last traces of melted plastic, celebrate your accomplishment! Your cast iron skillet is now almost free from the plastic’s grip and ready to resume its culinary duties.
- A Final Inspection: Once you’ve completed the scraping process, inspect the skillet thoroughly. Run your hand across its surface to ensure you’ve successfully removed all traces of plastic. Any lingering plastic can be dealt with through another round of gentle scraping or using the baking soda paste method.
Getting Rid of the Last Bits
Congratulations on your diligent efforts in removing the majority of the melted plastic from your cast iron skillet! As you approach the final phase of plastic liberation, it’s not uncommon to encounter some tiny, clingy remnants. But fret not, we have another technique up our sleeves to bid farewell to these last bits. Here’s how to do it:
- The Tiny Stragglers: If you find that some small bits of plastic are still clinging to the skillet despite your previous efforts, don’t be discouraged. These tiny stragglers can be tackled with care and finesse.
- Enter the Metal Spoon or Spatula: To deal with the last bits of melted plastic, you can enlist the help of a metal spoon or spatula. Choose a spoon or spatula with a smooth, rounded edge, as sharp edges may inadvertently scratch the skillet’s surface.
- Gentle and Cautious Scrape: With the metal spoon or spatula in hand, gently and cautiously scrape the last bits of plastic off the skillet. Apply the lightest pressure possible to avoid any unwanted scratches.
- Precision is Key: Focus on the specific areas where the plastic is still visible. Work methodically and precisely, ensuring you cover every last bit. The goal is to leave no trace of plastic on your beloved skillet.
- Check Your Progress: Periodically stop and check your progress. Run your fingers along the surface to detect any lingering plastic. If you encounter any stubborn bits, continue your gentle scraping.
- Avoid Aggressive Scraping: It’s essential to avoid any aggressive scraping at this stage. The goal is to gently coax the last bits of plastic away without causing any harm to the skillet’s surface.
- Extra Caution on Seasoned Surface: Pay special attention to areas with a well-seasoned surface, as excessive scraping might disturb the seasoning. The seasoning not only provides a non-stick surface but also adds flavor to your culinary creations.
- Take Your Time: As with every step in this process, patience is paramount. Take your time to ensure a thorough removal of the last plastic bits.
- Celebrate Your Triumph: As you successfully remove the last remnants of melted plastic, take a moment to celebrate your triumph! Your beloved cast iron skillet is now nearly pristine and ready to be seasoned for future cooking adventures.
- Optional Baking Soda Paste: If there are any lingering plastic traces or stubborn stains, you can create a gentle paste using water and baking soda. Apply the paste to the affected areas and gently scrub with a soft cloth or sponge. Rinse thoroughly and dry the skillet after using the paste.
Washing and Cleaning
With the triumphant removal of the melted plastic from your cast iron skillet, it’s time to embark on the crucial task of giving your beloved cookware a thorough cleaning. Follow these steps to ensure that your skillet is spotless and ready for its next culinary adventure:
- Prepare Warm Soapy Water: Fill your kitchen sink or a large basin with warm water and add a small amount of gentle dish soap. The warm water will help to dissolve any lingering residue, while the mild soap will aid in cutting through grease and grime without harming the skillet’s seasoning.
- Submerge the Skillet: Carefully place your cast iron skillet into the warm soapy water, ensuring it is fully submerged. Allow the soapy water to work its magic, loosening any remaining traces of plastic and other particles.
- Use a Soft Cloth or Sponge: Choose a soft cloth or sponge to clean the skillet. Avoid using abrasive scouring pads or steel wool, as they can strip away the seasoning and scratch the surface.
- Gently Clean the Surface: Take the soft cloth or sponge and gently clean the surface of the skillet. Pay special attention to the areas where the plastic was removed, making sure there are no lingering residues.
- Mind the Seasoning: Be cautious around the seasoned areas of the skillet. The seasoning is a valuable layer of flavor and non-stick properties that enhances your cooking experience. Avoid any harsh scrubbing that might disturb or remove the seasoning.
- Rinse Thoroughly: After cleaning the skillet with warm soapy water, thoroughly rinse it under running water. Make sure to remove all traces of soap to avoid any soapy taste in your future culinary creations.
- Dry the Skillet Completely: Once the skillet is thoroughly rinsed, use a clean, dry towel to pat it dry. Ensure that no moisture remains on the surface, as cast iron is prone to rust when exposed to water for extended periods.
- Air Dry or Stovetop Dry: To further ensure the skillet is completely dry, you can air dry it on a dish rack or place it on a warm stovetop burner for a few minutes on low heat. This will help evaporate any remaining moisture.
- Inspect the Skillet: Take a moment to inspect your cleaned skillet. You should be greeted with a pristine surface, free from melted plastic and any other residues.
- Rejoice and Re-season: Celebrate your successful cleaning endeavor! With the melted plastic gone and your skillet thoroughly cleaned, it’s time to reward it with a fresh coat of seasoning. Apply a thin layer of vegetable oil or shortening to the skillet’s surface, then heat it on low for a few minutes before wiping off any excess oil. This final step will protect the skillet and set the stage for countless delicious dishes.
The Baking Soda Boost (Optional)
Even with your best efforts, there might be instances where stubborn residue or stains still persist on your cast iron skillet. Fret not! We have a handy trick up our sleeves to tackle these resilient marks using the magical powers of baking soda. Here’s how to create a gentle yet effective baking soda paste to enhance your cleaning process:
- Gather Your Materials: For this optional step, you’ll need baking soda and water. Both are common household items that can be found easily in your kitchen pantry.
- Mix Baking Soda with Water: In a small bowl, combine baking soda with a few drops of water. Mix the two ingredients until you achieve a thick, smooth paste. The paste should be spreadable but not too runny.
- Apply the Baking Soda Paste: Using your fingers or a soft cloth, apply the baking soda paste to the areas of the skillet with stubborn residue or stains. Focus on the specific spots that need a little extra attention.
- Gently Scrub with Soft Cloth or Sponge: Take a soft cloth or sponge and gently scrub the affected areas with the baking soda paste. The mild abrasive properties of baking soda will help to lift off the residue without causing any damage to the cast iron surface.
- Be Patient and Deliberate: As you scrub, remember to be patient and deliberate in your actions. Allow the baking soda paste to work its magic, gradually breaking down the stubborn residues.
- Rinse Thoroughly: After scrubbing, rinse the skillet thoroughly under running water. Ensure that all traces of the baking soda paste are removed, leaving your skillet fresh and clean.
- Dry the Skillet Completely: As always, make sure to dry the skillet thoroughly to prevent any moisture from causing rust. Use a clean, dry towel to pat the skillet dry, or place it on a warm stovetop burner for a few minutes to aid in the drying process.
- Inspect Your Handiwork: Take a moment to inspect your cast iron skillet. You should notice a significant improvement in the areas that received the baking soda treatment. Any stubborn residue should be considerably diminished or completely gone.
- Re-Season (if Necessary): If the baking soda paste has not compromised the seasoning, you can proceed with using the skillet for your next culinary adventure. However, if you find that the seasoning has been affected, a quick re-seasoning step will restore your skillet’s protective layer and prepare it for future cooking endeavors.
Seasoning Your Skillet
To maintain the beautiful seasoning on your cast iron skillet and protect it from future mishaps, it’s time to re-season the pan. Apply a thin layer of vegetable oil or shortening to the skillet’s surface. Heat it on low for a few minutes, and then let it cool before wiping off any excess oil.
FAQ – Removing Melted Plastic from Cast Iron Skillet
Q1: Can I use other materials besides plastic for scraping off the melted plastic?
A: It is recommended to use a plastic scraper or spatula to avoid scratching the cast iron surface. However, if you don’t have a plastic scraper, a wooden or silicone spatula can also work without causing damage.
Q2: What if the plastic is deeply embedded or burnt onto the skillet surface?
A: If the plastic is stubbornly stuck or burnt onto the skillet, try repeating the heating and scraping process. You can also apply a baking soda paste to help loosen the plastic and make it easier to remove.
Q3: Is there any alternative to using ice to harden the melted plastic?
A: Yes, you can use a can of compressed air or a freezer spray to freeze the plastic quickly. Hold the can upside down and spray the plastic to freeze it, making it easier to scrape off.
Q4: Can I use metal utensils to scrape off the plastic if I don’t have a plastic scraper?
A: While using a plastic scraper is preferred to avoid scratches, you can use a metal spoon or spatula as a last resort. Be very gentle and careful not to damage the skillet surface.
Q5: Will using baking soda harm the seasoning of my cast iron skillet?
A: Baking soda is generally safe to use on cast iron, but it’s best not to use it too often. Using it occasionally for stubborn residue should not harm the seasoning significantly.
Q6: What if there are still tiny bits of plastic stuck in the skillet after following the steps?
A: If small bits of plastic remain, try using a soft-bristled brush or a toothbrush to scrub them gently. Avoid using anything abrasive to prevent damaging the skillet’s seasoning.
Q7: How often should I re-season my cast iron skillet to maintain its quality?
A: The frequency of re-seasoning depends on how often you use your skillet and how well you care for it. As a general guideline, re-season your cast iron skillet every few months or after intense cleaning sessions.
Q8: Can I use any type of oil for re-seasoning, or is there a recommended one?
A: You can use various cooking oils like vegetable oil, canola oil, or flaxseed oil for re-seasoning. Some users prefer flaxseed oil for its high smoke point, which can lead to a more durable seasoning.
Q9: What precautions should I take to avoid melting plastic on the skillet in the future?
A: To prevent melting plastic, avoid placing plastic utensils or containers on a hot skillet. Always check for any leftover plastic wrap or packaging before heating the skillet.
Q10: Are there any specific cleaning methods I should avoid to prevent damaging the skillet?
A: Yes, avoid using harsh cleaning agents, steel wool, or metal brushes, as they can strip away the seasoning and damage the cast iron surface. Opt for mild dish soap and soft sponges for regular cleaning.
Conclusion
As a fellow cooking enthusiast, I understand the frustration of dealing with melted plastic on a beloved cast iron skillet. However, fear not! With the right approach and a bit of patience, you can restore your skillet to its former glory. Remember, safety always comes first, so use heat-resistant gloves and be gentle during the scraping process.